The Rail table describes unworn rail profiles (or rail templates).
To view the content of this table, or to compare and modify some attributes of rails Rangecam provides a Rail Explorer shown below.
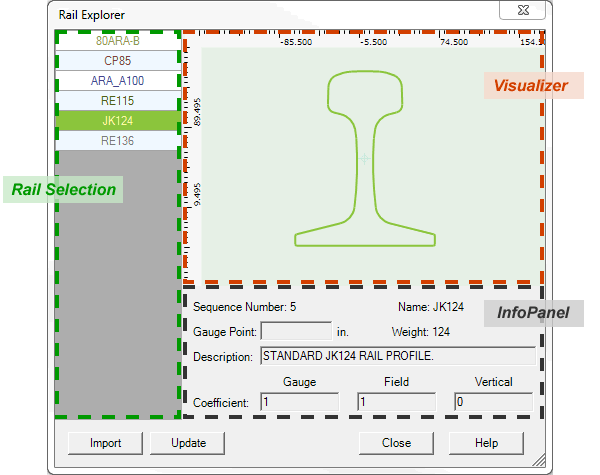
The Rail Explorer
The Rail Explorer contains the following controls (shown in the figure above): the Rail Selection panel, the rail graphic Visualizer and the InfoPanel.
The Rail Selection grid shows a list of all rail templates in the database. It allows the user to select one or several rail types.
The Visualizer displays a rail shape.
The Information Panel under the Visualizer shows information about selected rail
The rail table dialog has an Import button to load new rail templates in a database.
A button Update opens a new dialog to modify some rail attributes.
The whole form and its panels are resizable and a user can the drag border of panel or the corner of the dialog to modify the size.
The Rail Selection grid is located on the left size of the Rail Explorer. It contains a list of all rails in the database, sorted by sequence number. This number is calculated by weight and is used to show rail types in some order in chart. The list is updated whenever the user imports a new rail profile or deletes an existing. If the user selects a new rail, the background color changes according the profile color in the Visualizer.
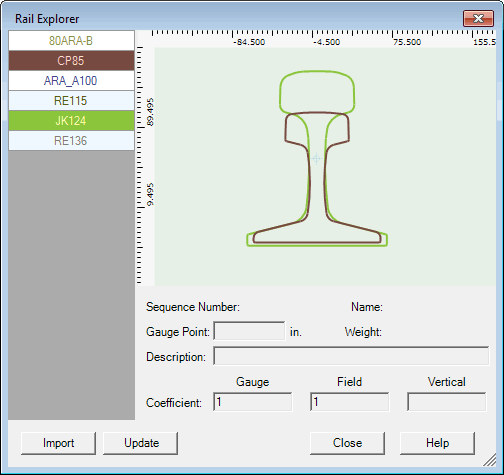
Rail Selection supports multiple rail selection. In this case, selection colors will be different for different rails.
Selection can be done or modified from a keyboard, by a mouse wheel or mouse click. The standard Windows convention is supported. When using the keyboard or mouse wheel, the Rail Selection control should be the focus. The focus can be set by key Tab or Shift+Tab (navigates in opposite direction) or by mouse click inside the control.
The content of the Visualizer and InfoPanel are updated as soon as the rail selection is changed.
Multiple Selection
The Visualizer draws one or many selected rail profiles. The color of the rail corresponds to the color of the selection in list of rail types. The Visualizer has rulers in mm used for rough estimations. The control supports zooming (by mouse wheel when control has a focus) and panning (when the user clicks, holds and drags the mouse). These features are helpful to see minor discrepancies in rail shapes.
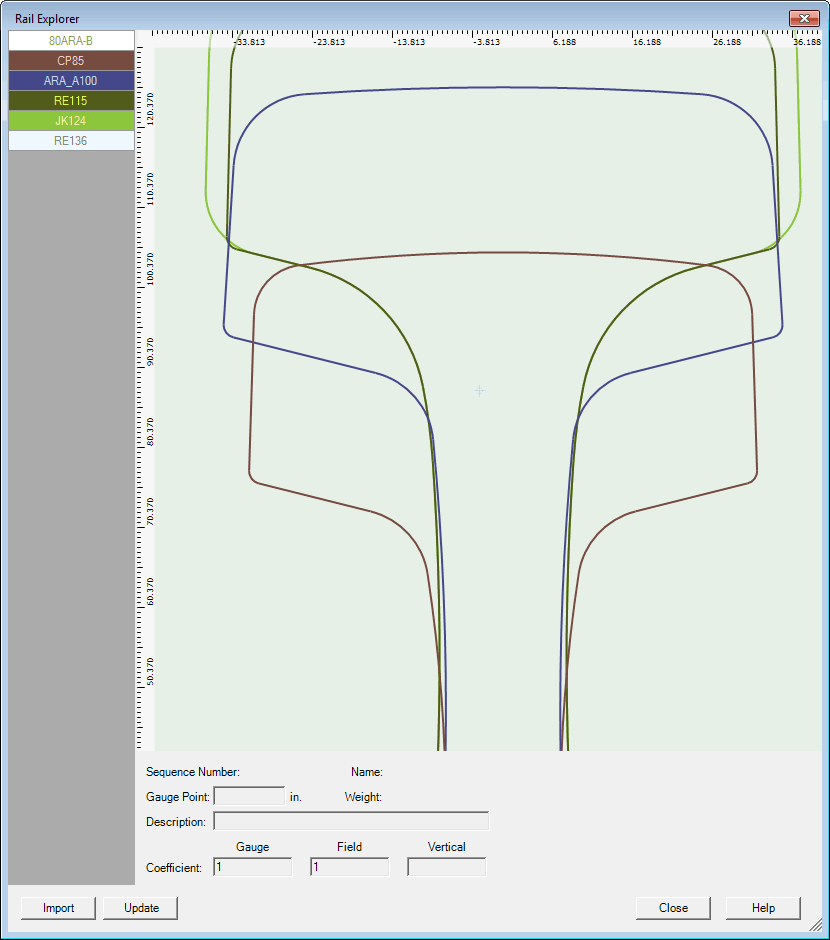
Zooming
Control has a highlight feature. If the user touches a profile by mouse pointer, the profile is highlighted in a bright lime color. If the mouse pointer is equally close to two or more profiles all of them are highlighted.
The Info Panel is located below the Visualizer and shows information about the properties of the selected rail. Each rail has a user-defined name and a description. The name must be unique. The weight of the rail is primarily for user reference; it is not used in any calculations.
The Gauge Point field describes the distance below the top of the unworn rail at which gauge-side and field-side wear are measured for the "fixed-point" method. If this field is left blank, the Gauge Point Reference Distance modeling option is used. For an explanation of the difference between "fixed-point" and "floating-point" methods of measuring side wear, refer to Modeling Options.
The three coefficients "Gauge, Field, and Vertical" are weighting factors used in the calculation of combined wear, according to the following formula:
cw = (gw x gc) + (fw x fc) + (vw x vc)
where cw is combined wear, gw is gauge face wear, fw is field face wear, vw is vertical wear, and gc, fc, vc are the coefficients for gauge wear, field wear and vertical wear respectively. If all three coefficients are set to 1.0 (the default), then combined wear is a simple sum of positive values of vertical wear and the two horizontal wear measurements. Negative values are not used in the calculation of combined wear.
The content of the Info Panel changes if several rail types are selected. In this case only properties that have the same value for all selected rails are shown. As a rule, such properties are Coefficients or Gauge Point.
The rail table dialog has an Import button. Import allows the user to specify a file containing the definition of an unworn rail profile. The rail import files are installed with the Rangecam Office System. They may be found in the RAILS folder within the installation folder.
The Update enables to user to modify some rail attributes. Clicking the button opens an Info panel, which works now in the Update Dialog.
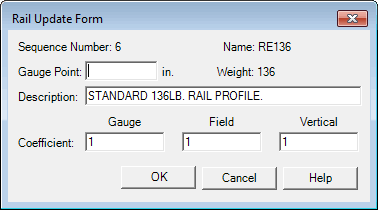
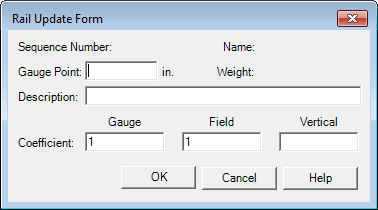
Rail Update Form to modify one and multiple selection
In some cases and configurations an access might be blocked or button is invisible. For example if database is read only. Another cases - predefined combined wear for some customers and policy forbidding modifications.