
Foot-by-foot geometry and GRMS data can also be imported to Rangecam databases.
The import dialog is reached from the Run/Geometry/Import menu pick on the Profile View window.
Import Geometry Run Setup dialog
Geometry and GRMS data may be imported from a source file in CSV or fixed-record-length binary format. In order to import the data, you also need a custom import program. The custom program allows Rangecam to import data from one of a wide variety of CSV or binary source files with different layouts and contents. To order a custom import program to your specifications, please contact Industrial Metrics.
The custom program will have a file name of the form cgi_...dia. When you receive this file, copy it to the following folder in your installation:
install-dir\Rangecam\RC101\EXE\APPL
where install-dir is your installation folder. Then use the Browse button in the dialog to retrieve the file.
When you click OK, a second dialog will appear.
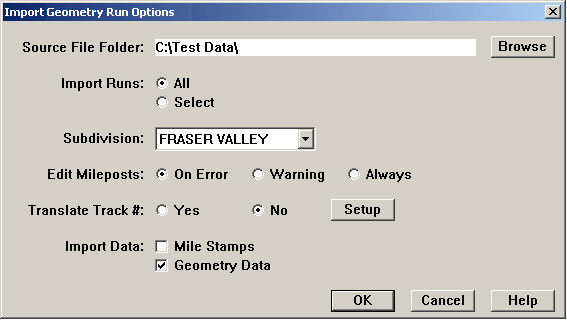
Example of Import Geometry Run Options dialog
This dialog is part of your custom import program. Consequently, the options available may vary. The options described in this section are typical.
The Browse button allows you to set the folder containing your import files. This is displayed in the Source Files field.
The Import Runs buttons allow you to import all the geometry runs in the source files folder, or a selection. Once you have set the Source Files folder correctly, clicking on the Select button will produce a dialog like this one:
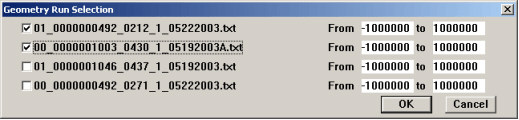
Import Geometry Run Selection dialog
Any runs checked in this dialog will be imported. If you wish to import a partial run, change the mileage values to the right. The "From" location should always be lower than the "to" location, regardless of the direction of travel.
Having selected runs, you must specify the subdivision to which the imported data belongs. Any subdivision in the database may be selected from the drop-down list. In order to set up a new subdivision, see topics Database Maintenance and Subdivision.
The import allows you to view the mileposts that were recorded during data collection, and, if necessary, correct milepost errors that would otherwise prevent the data from being imported correctly.
If individual tracks are identified by integers in your source file, and you wish to translate the integer values into an alphanumeric track code, click Yes to Translate Track #. A dialog will open allowing you to specify the translation.
You must also specify what data to import. You will normally import Geometry Data. You may also import Mile Stamps and Track Points.
Check Mile Stamps to import mile stamps to update the Location database table that contains distances between mileposts. This should be done at least once for each territory. The Location table will always reflect the run most recently imported with mile stamps. If importing data from different runs covering the same territory in different years, it is recommended that you import mile stamps for one year only - the one for which the mile stamps are most trusted. If you are importing profile data as well as geometry, it is advisable to choose one of them as the source of mile stamp locations - again, the source that is most trusted.
Check Track Points to import any track 'events' such as switches, crossings, etc. that may be stored in the geometry data. Imported track points are always added to those already in the database. Take care not to import the track points from the same territory twice, as that may create redundant information, which you will have to clean up later. (Note that the custom import program must support the importation of track points.)
Click OK to launch the import process. A record of imported runs is written to the daily log file.