The Reports menu on the Map window can be tailored to customer requirements. Shortcuts to run Rangecam reports, queries and charts can be added to the menu without programming. Each shortcut contains pre-selected options for the associated report. Users can run reports tailored to their organization's requirements by picking the report name from the menu and clicking the OK button on a pre-filled form.
Users also can change the pre-selected options if they want to.
Customizable User Report Menu
A default Reports menu is shipped with the software, but it is not expected to meet the requirements of all customers. The menu can be modified by a knowledgeable Rangecam user within the customer organization. Alternatively, it can be set up by the vendor to customer specifications. The menu tree can be saved in a ZIP file and distributed by email to end-users.
To run a report or query from the map Reports menu, select the data on which you wish to run the report or query, then pick the report from the menu. If you did not already select the type of data required by the report, you will be prompted to do so. A dialog with pre-selected options will appear. To run the report without changes, simply click the OK button. Or, make changes to the pre-selected options and then click OK. If you change options, take care to keep the changes consistent. For example, if changing a query for 0.5" vertical wear to 0.6", be sure the report title is consistent with the change.
In order to prevent the menu from being changed accidentally, changes made to the options of an item on the Reports menu are not automatically saved. Changes to the Reports menu are made through the "classic" Rangecam interface, which is also used to add new menu items.
Beside each item on the Reports menu is an icon indicating the report format. Charts are identified by a chart icon, Crystal Reports by a Crystal icon, CSV files by a spreadsheet icon, text files by a word-processor icon, HTML files by a web browser icon, and queries without a defined report, by a question mark.
Any user who is familiar with the "classic" Rangecam user interface can add new menu picks to the Reports menu or modify existing ones. Dialogs for reports, charts and queries supported by the Reports menu contain a Menu button. To add an item to the Reports menu, take the following steps:
For example, to add a Track Condition chart to the Reports menu, you would choose Reports/Track Condition Chart from the Profile View menu.
Select the desired report options. Include all "hidden" options, controlled by secondary dialogs, which you reach through Options buttons on the main dialog. It is a good idea to run the report to verify that all settings are correct before adding it to the Reports menu.
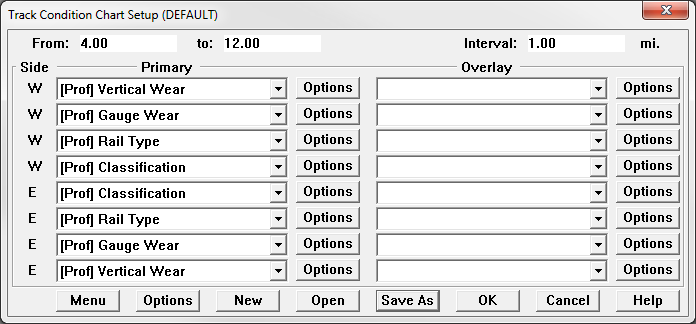
This example shows the Track Condition Chart setup dialog with options selected for rail wear, rail type and rail wear classification.
Having set all the options, click the Menu button on the dialog. A Save Report Options as Menu Pick dialog will appear, pointing to the folder Railroad View Reports.menu, which is a subfolder of the main Options folder created when Rangecam was installed.
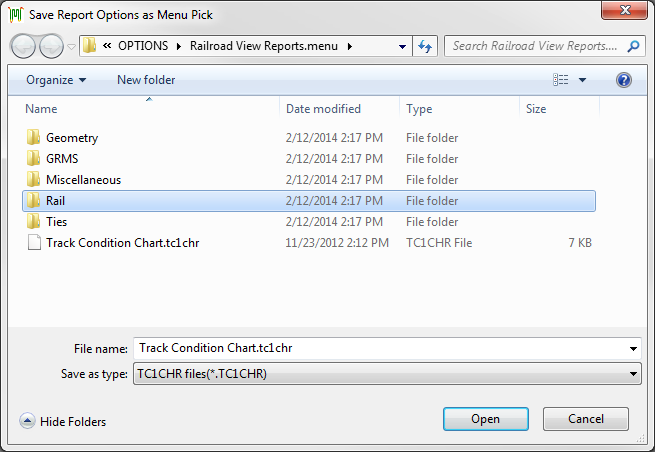
In this case, the name "Track Condition Chart" doesn't describe the options entered. A better name for the menu item would be "Rail Wear Classification Chart".
The file name you enter in this dialog will become the label of the item you are adding to the Reports menu. In most cases, you will not want to use the default file name. Enter a name that describes the report with the options you defined, that will be understood by the end user. You may use a combination of capital and lower-case letters, just as you wish the menu label to appear.
Do not change the file type in this dialog. The file type identifies the type of report to the Reports menu.
Grouping your reports into subfolders is recommended. The above example uses subfolders for different types of track test data: rail wear, geometry, GRMS, etc. You may group the reports any way you like, provided they are all within the Railroad View Reports.menu folder. Subfolder names appear on the Reports menu as submenu labels; therefore, naming them is just as important for usability as naming the reports themselves. As in any File Save dialog, new subfolders may be created by the standard Windows method (click the New Folder button or right mouse click->Create new->Folder).
The Save Report Options As dialog also allows files and folders to be renamed, moved or deleted. You can use it to reorganize the menu at any time.
The Reports menu is updated dynamically. There is no need to close the map window when making changes to the contents of the menu.
A company that uses Rangecam may wish to designate one "super-user" to create a Reports menu for everyone in the organization. This section describes how the menu can be copied from one user's computer to another.
To do so requires using tools, which are outside Rangecam itself. A data compression program like WinZip, which is capable of combining all files in a directory tree into a single file, will be helpful.
After the Reports menu has been built, browse to the Railroad View Reports.menu folder using Windows Explorer. It is found within the Options folder for your Rangecam installation - in Windows, normally in \Users\<user>\AppData\Rangecam\RC140\Default\. If you cannot see this folder, that may be because Windows Explorer is set not to show hidden files and folders. To make hidden files visible, choose Tools/Folder Options, click on the View tab, and select Show Hidden Files and Folders. If you can see this folder but can not access it that may be you do not have enough privileges.
Using a file compression/archiving program, save the entire Railroad View Reports.menu folder, with all its subfolders and files, to an archive file. Make sure to preserve the directory structure.
The archive file may then be copied or emailed to another computer on which Rangecam is installed. To install the Reports menu, find the Railroad View Reports.menu folder on the second computer and overwrite its contents with the contents of the archive. Note: this will have the effect of merging the archived menu with the menu already installed on the second computer. Any previously existing menu items with different names from the archived ones will remain. Menu items with the same name, on the same submenu, will be replaced. In order to completely replace the Reports menu on the second computer, move or delete all files and folders within the Railroad View Reports.menu folder before unpacking the archive.