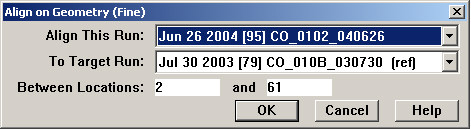
To automatically align one geometry or geometry-plus-profile run to another by matching data in geometry channels, choose Align on Geometry (Fine) from the Track Condition Chart Shift menu to open this dialog:
On the first line, select the geometry or combined run that you want to align. This defaults to the currently selected run. On the second line, select the run to which you wish to align it on GPS. If one of the comparison runs is a reference run (as in this example), it will be selected by default. If not, the oldest comparison run is the default selection.
The OK button calculates a set of shifted anchors, which, after a few moments, are displayed on the charts.
From this point on, the anchors are used exactly as if they had been created manually. Click the Apply button to view the alignment result; the charts are redrawn. Click Save to make the alignment permanent, or Undo to undo it and make changes. Details may be found in the Visual Alignment Interface topic.
Automatic alignment on geometry data works by analyzing a gauge channel (unloaded gauge if it is present, otherwise loaded gauge), and the curvature channel, looking for correlations between the two runs to be aligned. Because correlation between measurements taken at different times is far from perfect, and data signatures in one area can look much like those from another, especially on tangent track, the shifts calculated by geometry alignment may contain a small number of errors (usually less than 2%). Therefore, it is advisable to review the alignment before saving it permanently to the database. The following steps are recommended:
Use the Align on Geometry (Fine) feature to create shifted anchors. You may prefer to review the anchors at this point and delete any that appear wrong.
Apply the shift and review the results. Viewing at a chart scale of two miles or less per screen is recommended.
If you see any misalignments caused by incorrectly shifted anchors, Undo the alignment and correct or delete those anchors. You may also add manual anchors at this time to correct alignment in any areas where the automatic alignment has failed (most often near the start or end of the run, but occasionally in the middle).
Apply the shift and review results again. If alignment is exact in almost all areas, you may Save and make a few manual corrections afterwards.
If you have a profile run that is aligned to a geometry run as a result of being collected by the same vehicle at the same time using a common odometer, you can use the geometry alignment feature for the profile data by following these steps:
If the alignment of the profile run to the geometry run collected at the same time is not perfect, correct that first by shifting manually.
Join the profile run to the geometry run.
Select the combined run, and align it to another geometry or combined run using the geometry option.