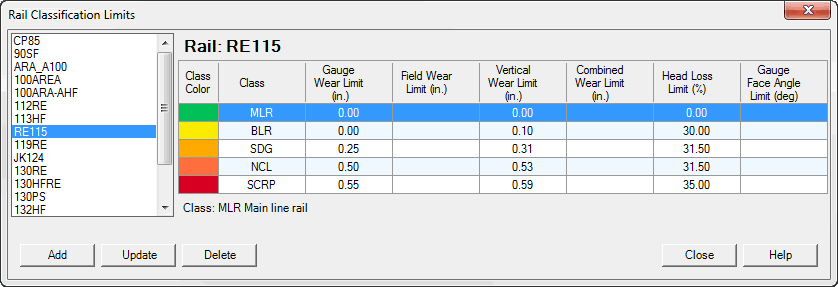
There are two dialogs to view/maintain the Rail Classification table.
When an user selects menu Database->Rail Classification the first dialog Rail Classification Limits appears.
By selecting rail in a left panel the user sees a list of available classification limits in a right panel.
The user can navigate in a classification grid, selecting a different classification. The classification color column shows the color associated with each classification. This color is used in a strip chart (if the corresponding option is selected) to visualize rail wear classification limits. Other columns show the values of the classification limits, which depend on selected units. A description of the selected classification is shown below the classification grid.

In the Office System, this dialog works as a viewer or as an editor. If the database is read-only, the Add, Update and Delete buttons are disabled.
When a class record is selected In the editor the user can update or delete it.
To delete a classification record the user can click the Delete button in the dialog or press the Delete key on a keyboard.
Clicking the dialog Update button or double-clicking the left mouse button when within a row in the Rail Classification Limits window opens another dialog to modify or delete the classification limits.

The Update Dialog
Unlike most other dialogs, the Rail Classification Limits table dialog is used both to update and add functions. This can be done because the rail classification table is dependent on the Rail and Classification tables. A rail classification record expresses a relationship between a rail and a classification.
The Add button opens the Add dialog, which includes the Class button, which is uised to select a classification.

The Add Dialog
The < and > buttons navigate through rail classification records for the given rail. When you select a classification, any rail classification values previously entered will be displayed and may be updated. If no values were previously entered, the fields will be displayed as blank. In either case, the Update button saves any newly entered values to the database.
The numeric values define the lower wear limits for the rail and classification. In the example above the lower wear limits for the SCRP classification for 136 lb. rail are defined as:
Gauge wear: 15 mm
Vertical wear: 20 mm
Head loss: 40 %
A logical OR relationship is applied when more than one limit is used. In the above case, 136 lb rail will be classified as SCRP if it has at least 15 mm gauge face wear or 20 mm vertical wear or 40% head loss.
Rail classifications form an exhaustive hierarchy without overlap. If there was a classification that was worse than SCRP, the lower wear limits defined for it would be the upper wear limits for SCRP. In fact, there is no worse classification; hence upper limits are not defined.
The following rules apply to rail classification limits:
For a given rail type, limits must be defined for the same wear categories for all classifications.
For a given rail type, wear limits must be in non-descending order by classification.
By rule 1, since the gauge wear, vertical wear and head loss categories are defined for the SCRP classification of 136 RE rail, the same three categories must be defined for all classifications of 136 RE.
Rule 2 is a restatement of the rule described in the previous section: classifications must always be ordered numerically from best (least wear) to worst (most wear). A worse classification cannot have a lower wear limit in any category than a better classification. The following table shows acceptable settings for 136 RE:
| Classification Number | Classification Name | Gauge Wear Lower Limit | Vertical Wear Lower Limit | Head Loss Lower Limit |
|---|---|---|---|---|
| 1 | MLR | 0.0 mm. | 0.0 mm. | 0 % |
| 2 | BLR | 5.0 mm. | 5.0 mm. | 36 % |
| 3 | SDG | 10.0 mm. | 10.0 mm. | 36 % |
| 4 | NCL | 13.5 mm. | 18.0 mm. | 36 % |
| 5 | SCRP | 15.0 mm. | 20.0 mm. | 40 % |
Classification number 1 is the best. Its lower wear limits are set to zero across the board, and its upper limits are defined by the lower limits of classification number 2.
Notice that the head loss limit is the same in classifications 2, 3 and 4. This is acceptable. What is unacceptable would be a lower limit in a worse classification: e.g. a 34% head loss limit for classification 3 and 36% for classification 2.
Reminder: after every update of classification all runs that have corresponding information must be recalculated.